New Heritage Owner!

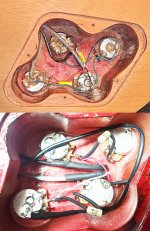
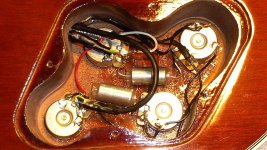
I have a 1999 Heritage H150CH. I just started to refinish it. I was going to remove all of the electronics until I took a closer look at it. I've never seen such a mess in my life. One of the flanges from the input jack is literally soldered to the top of one of the tone pots. As a result, the knob of that one pot has always been at a slightly different angle than the other 3 controls.

I'm afraid to even try to unsolder it.

View attachment 31824
Something about that setup looks fishy.   I've never seen that much corrosion, crud and dust in any of my factory setups and I have guitars from 87, 00, 03 and 04.   Did you buy that one new in '99?  If not,  I would suspect that someone else had a hand in there. 

 
Wow, I don't think I've ever seen a mess like that come out of the factory before. Stranger things have happened though. 

Either way, I'd be doing a wholesale electronics change on that. Get rid of it all and start over fresh. 

Would be interested in seeing the refinishing progress
Thank you very much for replying. I probably should not have posted that without providing more context. The real story behind this is one that I hope I don't ever have to fully explain publicly because it involves the name of someone who is very well known, someone who should have known better (I realize I'm being obscure here but I posted this because I'm looking for solutions and not looking to tarnish anyone's reputation.)

Please forgive me for not providing a bit more explanation. What you are seeing is NOT how it came from the factory. I actually don't know what it looked like at first. I had always had problems with intermittent shorting since the day I purchased it in January of 2000. However, my career was that of a general contractor, not a professional musician, so the problem constituted an annoyance but not a professional hindrance or else I would have addressed it more aggressively.

However, in 2005, a friend of someone who is now my EX-girlfriend, dropped my guitar and broke the headstock off. I don't mean cracked it. The only thing holding the headstock to the guitar was the strings. Heritage recommended a luthier for me. In the course of that repair, I also asked him to address the shorting problem. What you see now, for the most part, to the extent that it differs from the factory, is due to his implementation of the solution and it DID work. However, more than 18 years later, it does leave me with a bit of a problem.

I didn't intend to rewire the guitar but now, after reading your observation, I'm thinking I should do that. (Thank you for breaking the bad news to me, seriously.) So, this dovetails into the next question I have and that is, "How?" I compared the photo of my existing condition with the photo of the OP of this thread and I was unable to reconcile them.

My first impression, beyond the sloppy work, when comparing the 2 photos, it appears as though mine is wired incorrectly. Here are the two photos together oriented how I think they should be oriented. I attached a copy of to this post.

“A Dummies Guide to Rewiring a Heritage H150…” This is what I need.

Do you have any suggestions?

both.jpg

 
Something about that setup looks fishy.   I've never seen that much corrosion, crud and dust in any of my factory setups and I have guitars from 87, 00, 03 and 04.   Did you buy that one new in '99?  If not,  I would suspect that someone else had a hand in there. 
Thank you for replying.

“FISHY” is a good word for it. I explained a bit more of the back-story to @kbp810 above. In summary, it didn’t come from the factory that way. Yes, I did buy it new but how it got this way, is a whole other story you can read about above.

What appears to be corrosion is actually the remnants of my first “FAILED” attempt to refinish the guitar.

 
A lot of components used on new guitars are simply placeholders; the plastic nut, POS bridges and Especially the wiring harness.  The $100 spent on the upgrade was the best investment ever - except they're addictive; be very careful.

 
A lot of components used on new guitars are simply placeholders; the plastic nut, POS bridges and Especially the wiring harness.  The $100 spent on the upgrade was the best investment ever - except they're addictive; be very careful.
In general, I know this is true. However, I wouldn't expect this from Heritage on any level. Have you found examples of Heritage doing this kind of thing?

 
In general, I know this is true. However, I wouldn't expect this from Heritage on any level. Have you found examples of Heritage doing this kind of thing?
I've never met a guitar (any brand) that didn't improve from an upgraded harness.  Heritage is no different.

 
Upgrading the harness will do certain things depending on the parts used.   You can get pots with different tapers, which means that how quickly or smoothly the sound changes will be different with a 15% audio taper vs a 30% taper or a linear taper.    What these numbers mean is that for a 500K pot,  a 15% will measure 75K ohms when turned 50%.   A 30% taper will measure 150K ohms at the mid point.  Linear taper means it will be 250K when turned half way.   Since volume is a logarithmic function (because we hear that way),  the use of a log measurement is supposed to make it more like what you hear.  Turn it up from  50% to 100% and it sounds twice as loud. 

The capacitor value will make a huge difference in the brightness.   In the typical humbucker setup,  a .022uF cap is used.   The higher the value, the darker the sound as you roll off the control.  You might even want to have different values, like .015 for a neck pickup vs .022 for the bridge.   I really don't hear a difference between the Vishay metal film caps that Heritage uses and an oil filled cap.   The Vishay caps are good units.  

If you can solder, then it's not hard to make up a harness.   I made a template out of a piece of cardboard, and soldered everything except the pickup and switch on the cardboard.   Then I mounted the pots, connected the caps and ground wire and installed it.  This is the result.

harness.jpg

Finally there's vintage wiring scheme vs modern wiring scheme.   You can read how these differ lots of places.   Seymour Duncan has wiring diagrams for each type.   https://www.seymourduncan.com/resources/pickup/wiring-diagrams

For Heritage guitars, you want short shafted pots.  

That's all for now.   It's a fairly easy job assuming you can solder.

 
Upgrading the harness will do certain things depending on the parts used.   You can get pots with different tapers, which means that how quickly or smoothly the sound changes will be different with a 15% audio taper vs a 30% taper or a linear taper.    What these numbers mean is that for a 500K pot,  a 15% will measure 75K ohms when turned 50%.   A 30% taper will measure 150K ohms at the mid point.  Linear taper means it will be 250K when turned half way.   Since volume is a logarithmic function (because we hear that way),  the use of a log measurement is supposed to make it more like what you hear.  Turn it up from  50% to 100% and it sounds twice as loud. 

The capacitor value will make a huge difference in the brightness.   In the typical humbucker setup,  a .022uF cap is used.   The higher the value, the darker the sound as you roll off the control.  You might even want to have different values, like .015 for a neck pickup vs .022 for the bridge.   I really don't hear a difference between the Vishay metal film caps that Heritage uses and an oil filled cap.   The Vishay caps are good units.  

If you can solder, then it's not hard to make up a harness.   I made a template out of a piece of cardboard, and soldered everything except the pickup and switch on the cardboard.   Then I mounted the pots, connected the caps and ground wire and installed it.  This is the result.

View attachment 31849

Finally there's vintage wiring scheme vs modern wiring scheme.   You can read how these differ lots of places.   Seymour Duncan has wiring diagrams for each type.   https://www.seymourduncan.com/resources/pickup/wiring-diagrams

For Heritage guitars, you want short shafted pots.  

That's all for now.   It's a fairly easy job assuming you can solder.
That is incredible. I had already decided I needed to start over but I didn't know where to begin. Thanks to you, I have a roadmap. I didn't even know where to start to ask about this.

I appreciate this so much. I don't think I've ever read a single posting anywhere on any website that compares to how helpful your posting has been.

I can't thank you enough.

One question that might answer itself once I get going but I don't see the input jack so I assume it doesn't lead into this compartment, is that right?

 
Last edited by a moderator:
I started with RSGuitarWorks.  I stopped using them when they forgot how to make an H-575 harness; they wanted to charge for a custom assembly even though I know they've produced them in the past.
The H-150 harness is the same as the Les Paul's.  They'll get you going with schematics.  Drop your volume to the 5-8 level and lower the tone as needed.  The change is eye opening.

I don't hear a lowering of volume as much as a cleaning up with the volume pot.  The pot values make a huge difference in the circuit between the pickups and amplifier.  A good harness should allow you two or three useful tones without adjusting the amp.  RS recognized that and created a better mousetrap.
Fantastic. Thank you so much. I'm convinced for sure. I am going to unsolder the mess I have today.

 
I don't hear a lowering of volume as much as a cleaning up with the volume pot.  The pot values make a huge difference in the circuit between the pickups and amplifier.  A good harness should allow you two or three useful tones without adjusting the amp.  RS recognized that and created a better mousetrap.
That's true if you're running with a lot of gain.    If you're plugged into a Princeton Reverb or a Heritage Patriot with a clean signal,  it just lowers the volume.    That's more a function of the amp.     But lowering the volume on most guitars will also tend to get darker, which is why some people put in a treble bleed circuit.   It adds a bit of treble back into the signal.

There's a pretty cool worksheet called GuitarFreak that will show how the changes in capacitors and pots will change the frequency response of a guitar pickup.

http://www.jocidapark.com.au/circuits/GuitarFreak_6_41_161016.ods

You can run it in the Free LIbre Office spreadsheet.    There's also an Excel version.

http://www.jocidapark.com.au/circuits/GuitarFreak_6_40_210816.xlsm

 
Granted, most of the amps burning here are 60's Marshall clones.  Even with the Marshall JTM 45, JTM 45-100,  Heritage Colonial or Fender Vibro King, I lower the volume and drop the tone to clean up the sound.  Perhaps old habits die hard...  I prefer less treble most of the time.
I think you wrote about linear and logarithmic pots above.  Dave, from Ann Arbor Guitars, does a superb job discussing the difference.
There are 6 videos in all.  IMHO Well worth the time.  Here's #1:


That is incredible. I had already decided I needed to start over but I didn't know where to begin. Thanks to you, I have a roadmap. I didn't even know where to start to ask about this.

I appreciate this so much. I don't think I've ever read a single posting anywhere on any website that compares to how helpful your posting has been.

I can't thank you enough.

One question that might answer itself once I get going but I don't see the input jack so I assume it doesn't lead into this compartment, is that right?
I didn't catch a picture of the outside of the input jack but if there is no jack plate then you have one of the barrel jacks. I would address that as well while you're changing everything else out.

 
I didn't catch a picture of the outside of the input jack but if there is no jack plate then you have one of the barrel jacks. I would address that as well while you're changing everything else out.
You are right and it has always been a problem (which is probably why the luthier who worked on this soldered it to the top of the tone pot). Can you point me in a direction as to how to go about changing the barrel  jack to one with a plate?. Maybe there is a kit for this?

In the time since I read your posting about, "Upgrading the harness will do certain things depending on the parts used...", I have been immersed in videos about pots, capacitors, shielding, and wiring. I had no idea there was so much to this but thanks to you, I am starting to get a clue.

 
I didn't catch a picture of the outside of the input jack but if there is no jack plate then you have one of the barrel jacks. I would address that as well while you're changing everything else out.
Sorry that I got a little confused about the reference to the earlier posting made by someone else. I don't know how to edit it so this is the best way I know how to fix it at this point. However, I really do want to learn how to go about changing out the input jack to one with a plate.

 
You are right and it has always been a problem (which is probably why the luthier who worked on this soldered it to the top of the tone pot). Can you point me in a direction as to how to go about changing the barrel  jack to one with a plate?. Maybe there is a kit for this?

In the time since I read your posting about, "Upgrading the harness will do certain things depending on the parts used...", I have been immersed in videos about pots, capacitors, shielding, and wiring. I had no idea there was so much to this but thanks to you, I am starting to get a clue.
 If you want to get rid of the barrel jack you can drill out the input jack hole with normal wood drill bits. When you have the hole to the proper size you will need to use a plastic or metal jack plate and drill pilot holes for the jack plate mounting screws. I use the Puretone input jacks. Check out youtube videos to help with this.

 
 If you want to get rid of the barrel jack you can drill out the input jack hole with normal wood drill bits. When you have the hole to the proper size you will need to use a plastic or metal jack plate and drill pilot holes for the jack plate mounting screws. I use the Puretone input jacks. Check out youtube videos to help with this.
Perfect!  I see so much about wire gauge and transferring electrical energy.  When one thinks about it, you could use quad 0 wire gauge for your instrument and speaker leads but ultimately the connection between your jack and instrument cable is just a fraction of a square mm, smaller than pin point.  I've heard about these jacks but haven't seen them for sale.  Thank you golferwave!

https://www.amazon.com/Pure-Tone-Full-contact-Mounting-Hardware/dp/B0BXB73DT8?th=1
They really are the ticket, and not much more expensive than a regular Switchcraft input jack.

 
Upgrading the harness will do certain things depending on the parts used. 
I would like to get your opinion on something. I was studying the various components and thinking how to put them together when I wondered if there might be an easier way for someone like me who has no prior knowledge in this subject.

I found the following kit:

Mojotone Solderless Les Paul Short Shaft Guitar Wiring Harness Manufacturer Part Number: Z4LES728 for $119.99. It includes 4 x CTS 500k vintage-taper pots, 1 x Switchcraft USA toggle switch, 1 x Switchcraft USA mono output jack and 2 x Mojo Tone Vitamin T oil-filled .022uf capacitors. (Sweetwater: https://www.sweetwater.com/store/detail/Z4LES728--mojo-tone-solderless-les-paul-wiring-harness-short-shaft)

By coincidence, I studied a video yesterday that compared 8 different capacitors. I had already concluded that I found the sound of the paper in oil .022uf to be most pleasing to my ear and I think that is what is in this kit.

Also, I will be drilling out the shaft where the barrel jack resides so I'll need a jack cover. Gibson Accessories Metal Jack Plate for Les Paul – Nickel Item ID: PRJP040 for $12.99 (Sweetwater https://www.sweetwater.com/store/detail/PRJP040--gibson-accessories-jack-plate-nickel).

You were addressing the taper on the pots and (going by memory now) and saying that a logarithmic taper is more consistent with the way we hear changes in volume. Do the pots in this kit represent what you were recommending?

I really appreciate all that I've learned from you so far. Many thanks.

 
Back
Top